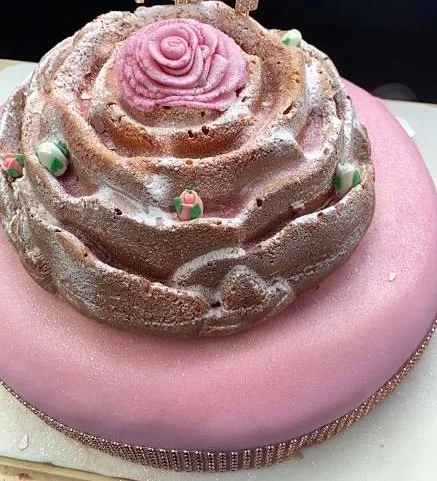
21st birthday cake: Strawberries and cream

Serves 30
Preparation time: 45 minutes
Cooking time: 1 hour 30 minutes
Decorating time: 1 hour 30 minutes
There is no denying that this cake, like most home made birthday cakes, will take you a considerable amount of time. It really will be a tiring labour of love but when you hand it over you will make somebody's day. Try not to get stressed, remember that your recipient will be so happy to receive the cake so do not stress too much about anything not looking perfect, they will most likely only notice this if you mention it.
Usually with birthday cakes I try to do them over a few days, the issue with vanilla sponge cakes is that unlike chocolate cakes, they don't stay moist anywhere near as long so I try to do the cakes the morning I need them or occasionally the evening before. The bottom tier is a classic Victoria sponge which goes beautifully with strawberries and cream.
I state vanilla paste here, it is slightly stronger and I find it is better here as it is not liquid but a gel, you can however use the liquid.
As this cake was for a beautiful young lady and the top cake was a rose I wanted the colours to also be sparkly rose but you don’t have to stick to this, feel free to make it your own and use your own colour palette.
Ingredients for the bottom tier
450g butter, room temperature plus a little extra to grease the tins
450g caster sugar
8 eggs, room temperature
450g self-raising flour
2 tsp baking powder
Pinch of salt
4 tbsps of milk, room temperature
150g fresh strawberries, cut into slices
10g freeze dried strawberries
Ingredients for the rose cake
Non-stick baking spray (or an oil spray such as sunflower or rapeseed)
225g butter, room temperature
300g caster sugar
1 tbsp vanilla paste (or extract)
4 eggs
400g plain flour
1 tsp baking powder
½ tsp bicarbonate of soda
50g freeze dried strawberries
180ml buttermilk
Ingredients for the buttercream
225g butter, room temperature
450g icing sugar, sifted to remove lumps
Pinch of salt
80ml double cream, cold
2 tsps vanilla paste (or extract)
Decoration
750g pink fondant icing
30cm cake drum (square, round or rectangular)
750g white fondant icing
26cm thin cake board
1 meter of 25mm rose diamanté mesh ribbon trimming
Double sided tape
Edible pink glitter
Edible silver glitter spray
10 icing rose buds, 5 pink, 5 white
Champagne bottle candles
Diamanté ‘21’
Equipment needed
26cm spring form cake tin
23½ cm Rose bundt tin - I like to use Nordic as the cakes release perfectly
Palette knife (ideally although an ordinary butter knife can be used)
Rolling pin
Sheet of paper and pen
Scissors
Cling film or food bag
Method
Early on the day or late the night before
Start with your Victoria sponge cake as this needs to cool in order for you to ice it.
Preheat your oven to 160c.
Grease your cake tin with the butter and line with baking paper on both the bottom and sides.
In a stand mixer, add all of your ingredients except the milk and strawberries and mix until the mixture is fully combined and light and fluffy. The finished batter should fall off a spoon easily, if it does not, add the milk a tbsp at a time until the consistency is right. If you take a spoonful of the mix and hold it up over your bowl, your batter should softly fall off.
Put the mixture into the cake tin and level off the batter as best you can.
Put into the oven and bake for 25-35 minutes until golden brown, risen and your testing stick comes out clean. You will also find that the cake will have shrunk away from the edges a little and will feel 'springy' when you press against it. Don't open your oven for the first 20 minutes at least as otherwise the cake will sink.
Remove from the cake tin and put to one side on a cake rack to cool.
Once your Victoria sponge is out of the oven turn to your rose cake.
Increase the oven to 180c.
Take your bundt cake and spray with the non-stick baking spray. Take a little of your flour and scatter inside also - to look nice you really need to avoid any of the cake edges breaking off so take time to ensure you fully coat the inside with the spray and the little ledges are floured. Tap out any excess flour. Now add the baking powder and bicarb on the top of the flour and briefly stir to mix through.
In a stand mixer that is fitted with a paddle attachment, cream the butter and sugar on a medium speed for 2 minutes, then scrape down the sides and mix for another 2 or 3 minutes until light and fluffy. Add in the vanilla paste and mix again. Scrape down the sides and add the eggs one at a time, mixing for a minute on medium, making sure it is fully incorporated before adding the next and scraping down the bowl between each addition.
To get the lightest cake possible the next stage should be done by hand but you can do it with your mixer, just mix until the flour is just incorporated then stop and continue. Put roughly ⅓ of the flour and ⅓ of the freeze-dried strawberries and mix in, gently fold in until just combined then add ⅓ of the buttermilk, scrape around the edges of the bowl and stir until just combined and then repeat this process 2 more times until both the flour and buttermilk are used up. Try not to overmix but do make sure there are no little pockets of flour.
Put the cake mix into the prepared bundt cake pan and level as best you can. Bake in your preheated oven for around 45 minutes, checking after 35 then every 5 or so minutes after, it could be it takes closer to an hour, this is going to totally depend on your oven.
Once baked put to one side for half an hour to cool a little.
The next step is to place the rose cake on the top of the base cake. You now need the cake to come out in one piece without a hitch. Even if you have properly greased your tin this is always a tense moment. Pick up the tin and gently tilt to one side - this should pull the cake off of the edge a little, I then try to tease the cake away as much as I can all around being very careful to not damage the cake. Take a plate and put over the top of the tin and carefully tip out the cake. If any part of the cake has stuck, patch it back in as carefully as you can.
Leave both cakes for at least 2 hours to totally cool down.
Early/mid afternoon
Turn to the icing and decorating of the Victoria sponge.
Into your stand mixer that is fitted with the whisk attachment, mix the butter until lighter and fluffier - around a minute.
Add ¼ of the icing sugar and the salt and very slowly mix. I say very slowly or you will have a kitchen full of sugar dust. Once incorporated repeat 3 more times until the icing sugar is totally beaten in then turn up the speed to high and mix for a couple of minutes until very light and fluffy. Add the double cream and vanilla and on a lowish setting just mix until incorporated then increase the speed to high and mix until really light and super fluffy, anywhere from 2-4 minutes.
Take your cake board and put a tbsp or two of buttercream on it and with a palette knife, spread this over the board, covering it with a thin amount of buttercream.
Remove any rings or bracelets you are wearing. You need to roll out the fondant icing and moisture, crumbs and jewellery are the enemy of fondant icing. Take cornflour and dust your work surface. Cut open your white fondant icing packets and knead and squish the 3 packets of icing together so they are one and so it is soft and pliable. This should only take a couple of minutes.
Lift your icing and redust your worksurface and your rolling pin. I find that the fondant can stick once you start to roll it out despite the cornflour, so for every couple of rolls, turn the icing one turn to the left and every 2 turns, turn your icing over very carefully.
The thing to say here is that you really do not want your fondant icing to dry out while you are working with it so from the moment you open the packets to the time you fit it to the cake, do this in one sitting rather than leaving the icing for any length of time.
We need this white icing to be as large as your board and so this is going to be a little difficult to work with. You just need to stay calm and when you are moving the icing, don't show fear. Roll until the icing is large enough to cover the whole cake board and is ideally the thickness of a £1 coin. Fondant icing can be a bit of a pain and stretches and cracks fairly easily so try to handle it with care and try not to make it thinner than a £1 coin, a little thicker is ok, thinner will be a complete pain to work with and could make you go grey.
You now need to move your board icing into place. The easiest way to move it from the board to your cake is to gently and carefully roll the icing around the rolling pin, I usually do this by putting my rolling pin to the very edge of one of the short edge. Before you start move your cake board to your work area close to the icing so you can move quickly. Lightly dust cornflour over the top of your icing and smooth it over - this removes any excess cornflour - and very carefully, starting on one edge, gently roll the icing around the rolling pin, wrapping it over itself.
Move the rolling pin so the icing is above your board and working from the edge left to right (or right to left) gently unroll the icing over your board. Once the icing is on the board you will not be able to move it because it will stick to the buttercream so take care on this part, ensure you have the edge of your icing and the edge of the board together. If you have cake smoothers you can use these to push out any air bubbles or creases otherwise just use your hands to gently push the icing against the buttercream firmly, being aware that you don't want fingerprints in the icing either. Don't yet trim. Move to one side.
Turn now to your Victoria sponge pink cake.
If you happen to have string then take the string and measure from the bottom of one side of your cake, across the middle of the top of your cake and down to the bottom of the other side. This should give you the size you need to roll your icing to.
As before, take cornflour and dust your work surface fairly liberally. Cut open your fondant icing and knead the icing so it is soft. If you have more than one packet then after cutting open the packets push the icing together before kneading. Knead until the different packets are now merged as one icing ball. This should only take a couple of minutes.
Redust your worksurface and your rolling pin and start to roll remembering to turn the icing one turn to the left every few rolls and carefully turning over every few turns. Roll until the icing is large enough for your cake (this is where your string comes in handy as you can measure around) and ideally the thickness of a £1 coin. Fondant icing can be a bit of a pain and stretches and cracks fairly easily so try to handle it with care and try not to make it thinner than a £1 coin, a little thicker is ok.
Once you are happy it is large enough, move your cake to your work area close to the icing so you can move quickly.
Take your thin cake board and put a tbsp or two of buttercream on it. Smear the buttercream over evenly with a palette knife and top with the cake, gently pushing down to ensure it is fully stuck. Take a tall glass and push into the very centre of the cake, removing the cake (this makes the perfect tester with a cuppa after you finish).
You now need to put the buttercream over the top and sides of the cake as this is effectively your glue to get your icing to stick nicely to the sides of your cake. Put 2 large spoonful's of the buttercream on the top of the cake and with a palette knife ideally (but a butter knife will also work), spread the buttercream over the top of your cake keeping it as even as possible. This does not need to be thick but does need to be even as this will affect your finished look. Don't worry if some goes on the sides as you will also be covering them with buttercream. Add another tbsp or two as needed.
Now the top is done, you need to cover the sides and the inside 'hole'. This is the part I used to really struggle with, much easier if you know how to plaster a wall. However, it is doable and you will get better with practice. With your knife carefully start to paint the outside, here I would say that although you don't want to waste buttercream, if you are a little heavy handed don't worry too much because effectively what you will do is with your palette knife, scrape off the excess. How you do this is hold you palette knife vertically against your cake and go around the edge removing any excess buttercream, scraping it into a spare bowl. Repeat with the top of the cake. You don't want too much buttercream because I find it makes the fondant icing too soft and sensitive. You want just enough to stick the icing and for me, it is easier to do the excess and scrape than try to be perfect first time. Buttercream the inside of the 'hole' and fill with the fresh strawberries and top with the remaining dried strawberries. Brush away any dust or crumbs from the sides.
Turn back to your icing. Lightly dust cornflour over the top of your icing and smooth it over - this removes any excess - and very carefully, starting on one edge (I tend to work left to right but if you are left handed you will probably want to do this right to left), gently roll the icing around the rolling pin, wrapping it over itself.
Move the rolling pin so the icing is above your cake and working from the edge of the cake left to right (or right to left) gently unroll the icing over your cake - this does need to be centralised so that it will cover all sides all the way to the bottom because once the icing is over the cake you will not be able to move it because it will stick to the buttercream.
If you have cake smoothers you can use these to push out any air bubbles or creases otherwise just use your hands. Firmly and carefully glide your hand or smoother over the top and then around the side. I do sometimes find that the fondant around the top edge cracks slightly, I have no idea why but do know that if I gently hold my hot hand against it for 5-10 seconds then with my finger I can carefully smooth it and it does somewhat diminish, having a slightly thicker fondant does help with this. I like to use my hands to push the bottom of the icing a little against the cake to ensure it is fully stuck to the cake. Then take a small knife and cut around the edge of the cake board. The easiest way to do this and not get finger marks in the icing is to move the edge of the cake so it overhangs your work top then take your knife and swipe downwards on the edge of your board, taking care not to cut it too short. Carefully work around each side.
Work out where you want the cake to sit - I like the cake sitting back somewhat so you have room for the name and candles at the front but you can centralise it, this is totally your call. Put some buttercream on the spot where you want to put your cake so that the cake will be glued to the bottom, don't do it as large as the cake but do make it so that most of the bottom of the thin board will have buttercream to stick to.
You need to carefully move your cake on to a cake board. Put the cake board next to the cake, you are not going to want to balance the cake for very long this way, smashing it is not an option. The best way to do move the cake is to push the cake to the edge of your worksurface and carefully list. Very very carefully lift up the cake and place it on top of the buttercream, moving it once it is down is never very easy as the cake boards get damaged really very easily and so is something you should avoid. Be careful not to damage the icing on the board as you put the cake down.
Take your rose and very carefully spread buttercream over the bottom of it, avoiding 2cm of the edge all around. You don't need huge amounts, just enough to stick to the bottom tier.
This is the icing and the cake now complete, just decorating to go.
With the scraps of icing you can make a rose to fill the bundt hole in the rose cake. Cut off any icing that has buttercream on it and discard. Cut a 5cm square out and roll one side to the other so it looks like a swiss roll. Cut another 5cm square only cut off the corners and wrap this around the swiss roll. Hold the swiss roll at the bottom and gently squeeze together. At the top, gently push the top of the icing down a little so the top is now softened. Repeat until you have a nice sized rose. The soft squares are effectively petals so just build it up. Carefully place in a small glass or ramekin to keep it safe.
Take your diamanté mesh ribbon and measure around your cake, overlapping by 5cm. Cut the ribbon and put double sided sticky tape on the back last 5cm overlap. You now need to decide which side you want your front to be and put the ribbon around the cake with the overlap being the opposite side. Very carefully but firmly pull tight so there’s no slack and with the overlap, carefully press against the start of the ribbon. This should now snuggly fit.
Put the fondant rose and put it in the top of the rose cake, this will hide the hole in the top of the cake. Take your glitter spray and spray all over the cake to give it a glittery silver hue. The glitter spray clogs really easily so you may need to bang the bottle on the worksurface every couple of sprays, it is annoying but stick with it. Sprinkle the bottom of the cake with pink glitter and place the little roses all over the top cake.
Place the champagne bottle candles at the very front of the board (sticking down with buttercream if you like) and the 21 in the top towards the back.
Hey presto, one cake!